Cooking
The Point
Can you prepare food without your normal kitchen appliances? It's important to know how to safely make meals when the lights are out and the gas is gone.
You can eat "ready to eat" meals for a while, but you will need something more substantial for longer-term physical and mental health. Some foods require cooking before they are safe to eat and can slow the deterioration of food as well. Cooking is not only used in the preparation of food, but also in purifying water, and sterilizing pots, pans, utensils and medical equipment.
Having a safe source of cooking heat and knowing different means of cooking are vital to "be ready" for emergency survival.
Do This
- Learn how to safely use BBQ and other outdoor cooking equipment.
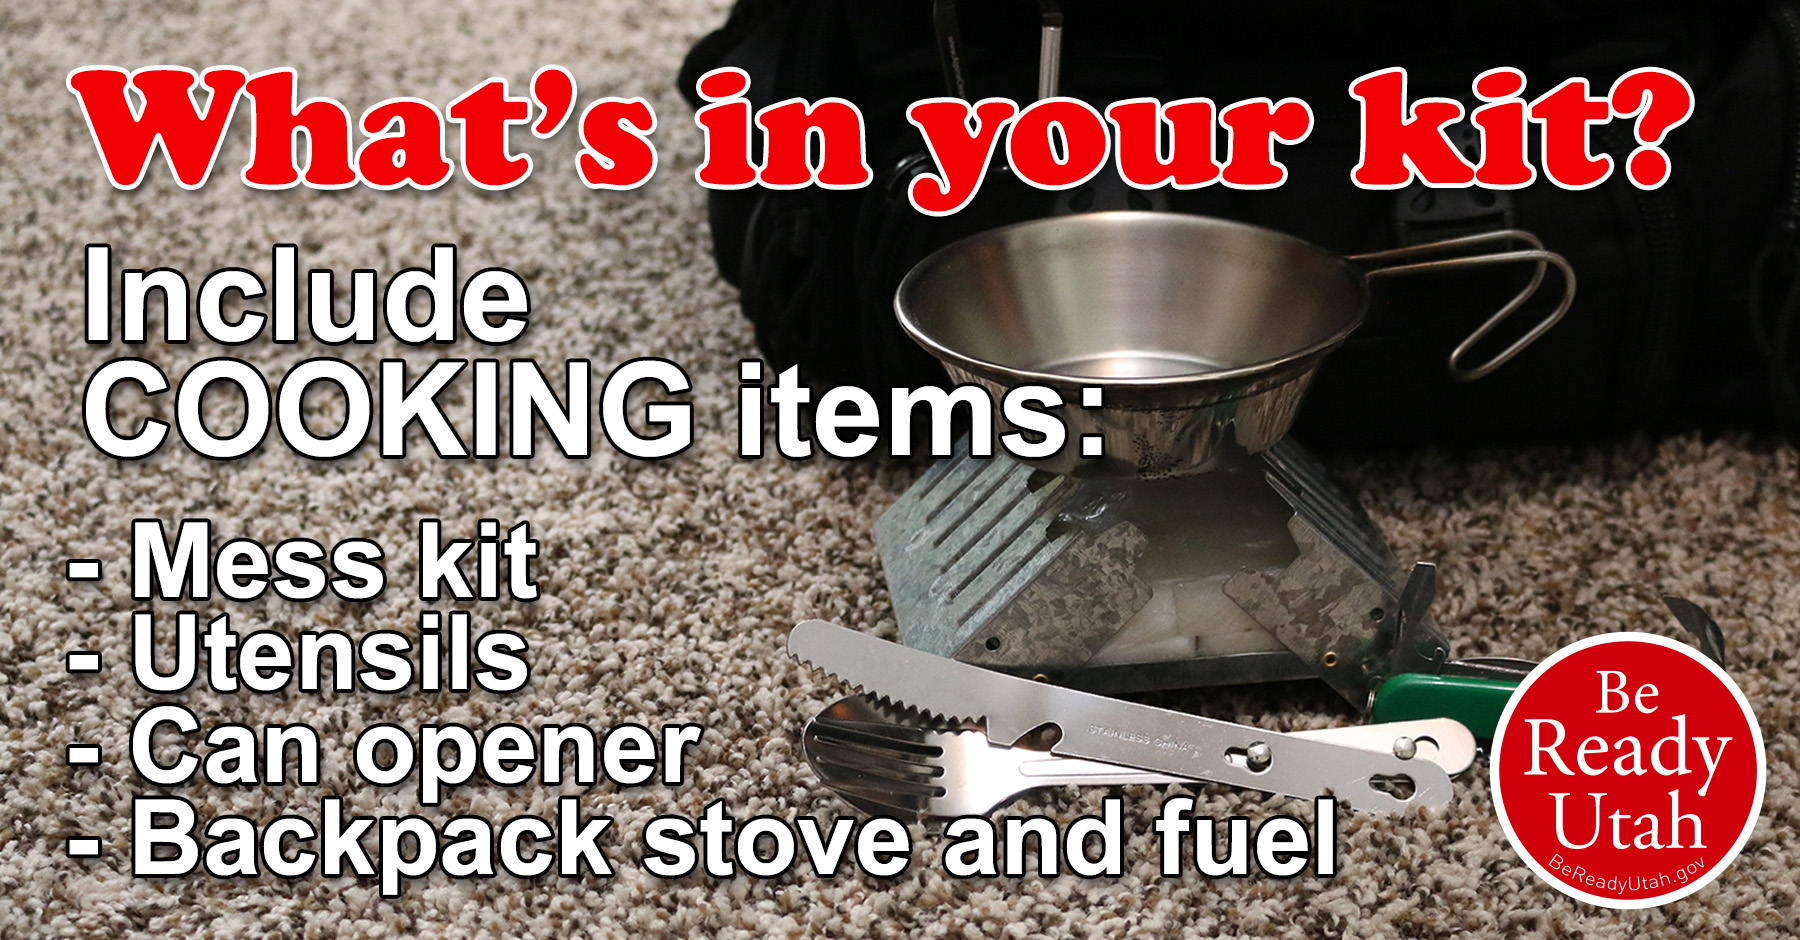
- Gather cooking equipment and keep it in working order.
- Safely store cooking fuels (charcoal, wood, propane) according to local regulations.
- Learn how to safely build, start, and put out a fire using a variety of different starting and extinguishing methods, then practice.
- BONUS: Build additional cooking supplies like a solar box oven or soda can stove.
Videos
- The Be Ready Buzz: Campfire Cooking in a Can
- PrepCast: Cooking Safety
- PrepCast: Indoor Emergency Cooking
- PrepCast: Charcoal Dutch Ovens and BBQ Grills
- PrepCast: Campfire Cooking
- PrepCast: Solar Cooking
- USFA: Grilling Fire Safety
- USFA: Kitchen Fire Safety
- 20 to Ready: Emergency Cooking
- NFPA: Dan Doofus “Kitchen for Trouble”
- NFPA: Learn Some Grilling Safety Tips
- NFPA: Checking Your Gas Grill for Leaks
- FEMA: Cooking Fire Safety
- FEMA: Watch What You Heat
- FEMA: Up in Smoke - Kitchen
- FEMA: Keep Things Away from Heat
- FEMA: Keep Kids Away from Cooking Areas
- FEMA: Prevent Scalds and Burns
- FEMA: Know What to Do if There is a Fire
Downloads
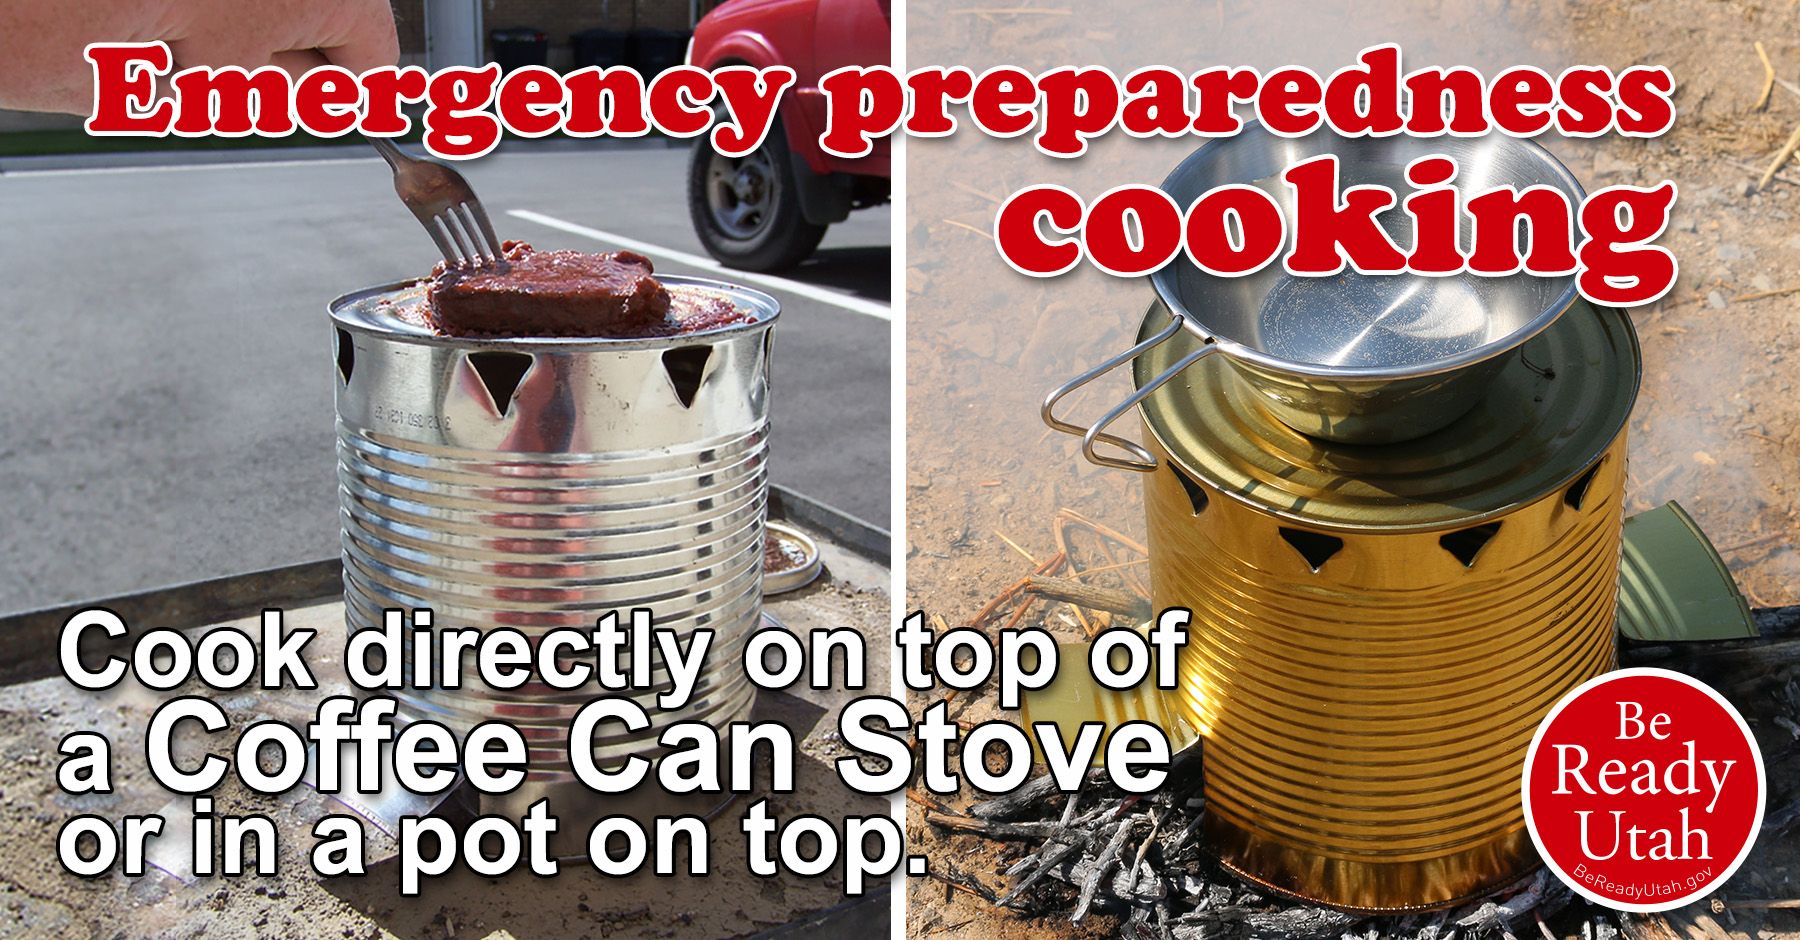
- Coffee Can Stove Instructions
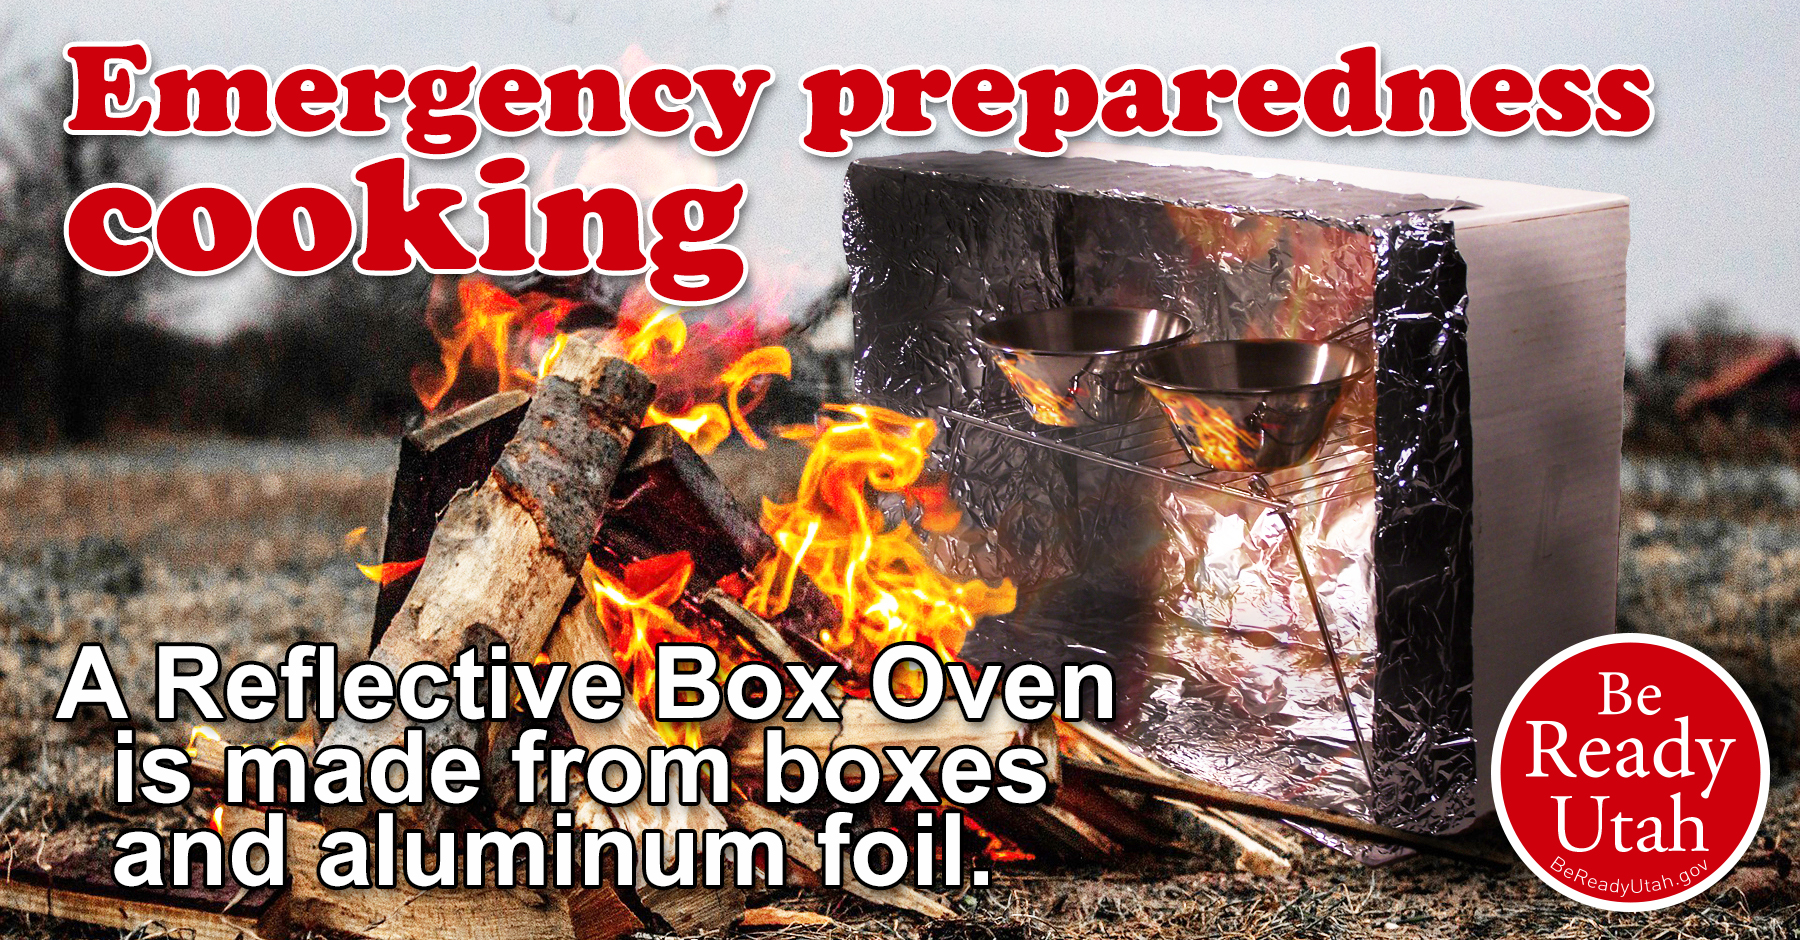
- Reflective Box Oven Instructions
- Soda Can Stove Instructions
- Solar Box Oven Instructions
- USU Ext: Dutch Oven Cooking
- USU Ext: Outdoor Recreation Cookbook
- USFA: Grilling Fire Safety
- USFA: Summertime Burn Safety
- USFA: Cook Safely! Prevent Kitchen Fires
- USFA: Recipe for Fire-Safe Cooking Recipe Card
- NFPA: Grilling Safety
- BSA: Safety Moment Propane Stoves
Why is cooking a basic survival need?
"Really? I've survived for many days without making a casserole or baking bread. Why is cooking a basic survival need?"
 Some people may question including the skill of cooking as a survival need, but it is more practical then just fancy food preparation. For one, some foods like poultry and pork require cooking before it is safe to eat. Some grains and legumes need to be softened with heat and water before your body can digest them. Other foods just taste better when they are warm.
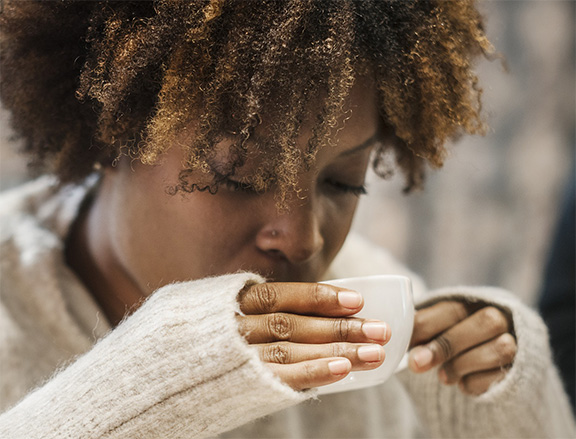
Don't forget that adding heated food to your body helps maintain body temperature and is mentally comforting. Imagine having a power outage in the middle of winter. It's cold. You are cold. The heater, the electric stove, and the microwave don't work. You have a camping stove and were able to set it up outside on your balcony and boil some water for some hot cocoa, coffee, or soup. That first cup tastes so good and it warms your body and your soul, bringing you a bit of hope and comfort.
A power outage can make foods in your refrigerator inedible in a matter of hours and foods in your freezer inedible in a few days. Cooking, grilling, smoking, or dehydrating can make those foods safe to eat. Cooking is not only used in the preparation of food, but also in purifying water and sterilizing pots, pans, utensils and medical equipment. It's also good to have the ability to warm water for cleaning, laundry, and hygiene. If you have basic camping supplies, you’re probably already set. Have fuel safely stored and ready to go.
Cooking Safety
Fires from cooking are the most common kind of house fire. Most burns also come from cooking and grilling accidents. Whenever you are preparing something in the kitchen or outdoors, be sure to follow some basic cooking safety rules.
- Keep anything that can catch fire away from the stove top. This includes dishtowels, bags, boxes, paper and curtains.
- Always stay in the kitchen when frying, broiling, or grilling food. Use a timer and don’t step away if you are frying or cooking with oil.
- Don’t cook when tired or taking medication that could make you drowsy. Make sure you are awake and alert.
- Watch what you are cooking. Fires start when the heat is too high. If you see any smoke or the grease starts to boil, turn the burner off.
- When cooking, wear short sleeves or roll them up so they don’t catch on fire.
- Turn pot handles toward the back of the stove so no one can bump them or pull them over. Spilled hot food and water can cause severe burns and scalding.
- If you have a fire in your microwave oven or standard oven, turn it off immediately and if you can, unplug it. Never open the door until the fire is out.

Cooking Safety Zone
- Make sure children and pets stay at least 3 feet away from a hot stove, grill, or campfire. Serious burns can happen in a few moments of inattention.
- Plug high-wattage appliances directly into wall outlets. Don’t use a power cord or extension cord. It can over-heat and cause a fire.
- Only use grills outdoors, away from siding and deck railings. Never use a charcoal or gas grill indoors.
- Clean grills often and remove grease or fat build-up.
- Make sure your gas grill lid is open before lighting.
- When building a fire outdoors or using a candle indoors, practice and teach fire safety. A bit of preparation and prevention can save a life.
- Have a fire extinguisher in the kitchen and check it yearly.
- Have a bucket of water on hand before lighting a campfire.
Ready to Eat Foods
Though this page is about cooking, the easiest way to prepare food is to not cook. If an emergency or power outage is only for a short period of time you can eat canned or other ready-to-eat foods without cooking. Ready-to-eat food is convenient, but after a while, you’re going to need and want something more substantial.
Canned or bottled food: Canned meats, tuna, and fruits don't have to be warm. They may be eaten without cooking. Canned veggies, pasta "O's", and some soups can also be eaten cold, though they probably taste better when warmed.
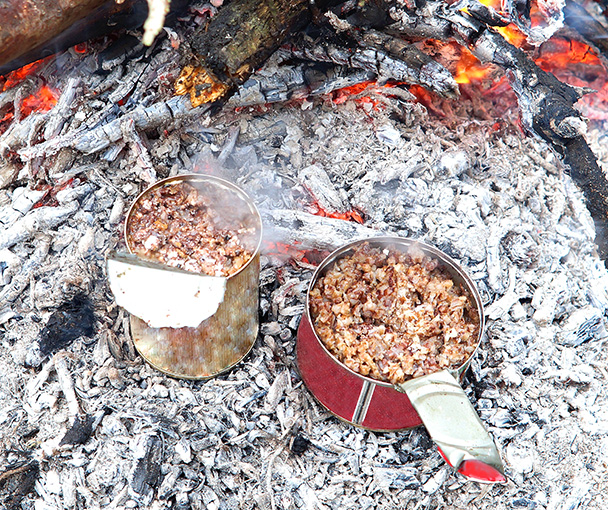
Canned Food in Campfire
Some canned foods that don't need to be reconstituted can be cooked directly in the can. If you want to give it a try, you can cook it directly in an outside fire. Make sure you have a level spot in the hot coals so the can doesn't tip over. If you have the option, you can also put the can directly on a camping stove. Remove the label to prevent it from catching fire and be sure to open the can before putting it in the heat to avoid an explosion or possible burn from hot, spurting liquid. Place the open can in the coals or on the lit stove with tongs or heat resistant gloves. Stir frequently to keep it from burning until it is the desired temperature. Remove from the heat and serve or eat directly from the can.
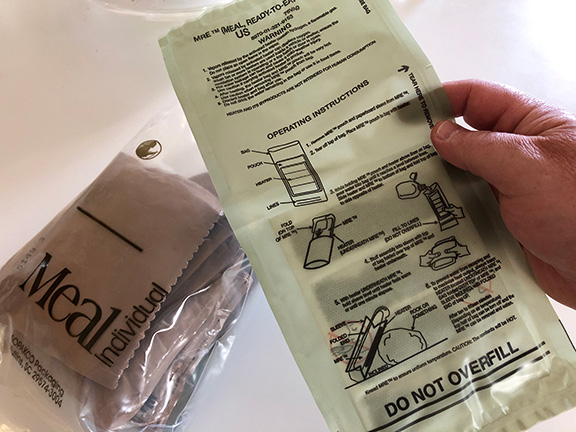
MRE Flameless Heaters
MREs: Meals-Ready-to-Eat (MREs) are the civilian version of the pre-packaged meals used by the military. They have a five to eight year shelf life and can be eaten cold, right from the package. No reconstitution is required. MREs do taste much better when warm, and can easy be warmed by placing the unopened package in boiling water. Many MRE packages come with a flameless heater that chemically reacts with a small amount of water producing heat for about 15 minutes, enough heat and time to warm one MRE meal and side. These are high calorie meals ideal for stressful situations, but should not be the sole source of food for any longer than three to five days. One full MRE packet is enough calories to last an entire day under short-term emergency conditions.
Indoor Cooking
Most emergency cooking is safest done outside, but depending on weather you may need some indoor cooking options. Always cook in well ventilated areas. Never use grills or camp stoves indoors. Be aware of carbon monoxide (CO) dangers even in garages and carports. Have CO detectors on all floors of your home and check them often for operability. If you have safe indoor cooking options, a benefit in cold weather is that it warms the house as well as cooks your food. Remember that anytime you have an open flame or other heat source, there is a real possibility of fire. Practice candle safety and keep extinguishers ready. 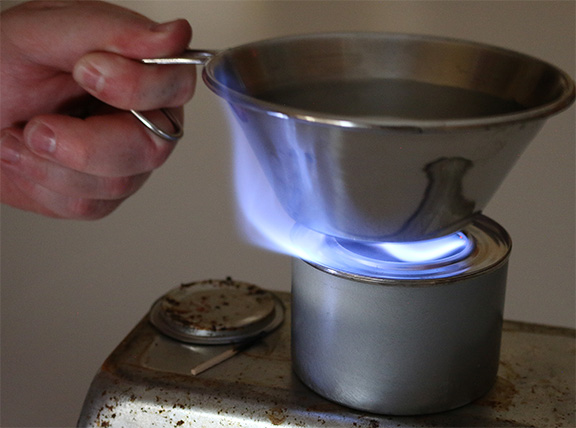
Emergency candles: They don't put out a lot of heat, but are sufficient for warming small amounts of food and boiling small cups of water. They can also be used for light. Keep candles in your emergency supplies and in disaster supply kits.
Chafing gel fuel: This is commonly known by the brand name Sterno. It comes in small and light weight cans that are also good for disaster supply kits. You are not going to cook your Thanksgiving dinner on it, but it works well for boiling small amounts of water for dehydrated or freeze dried meals and for cooking small amounts of food. You light it by opening the can and touching a lit match to the gel. You may not be able to see the flame, but you can feel the heat and hear the gel popping. To extinguish the flame, lightly put the lid over the opening of the can until the flame goes out, then push the lid down tight to prevent the remaining gel from drying out. If the gel dries out, it will not light and it is no good.
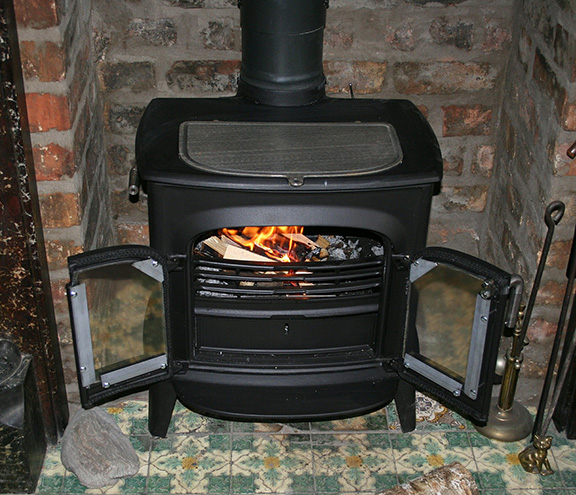
Fireplace and wood stove: These were what they used to cook in generations ago. Fireplaces and wood stoves have the added benefit of heating home in colder months. Be sure to keep a large supply of wood for fuel and have the chimney cleaned every year. If you have a large enough fireplace, you can cook inside it with your Dutch oven, with foil dinners, and with a reflective oven. Wood stoves get hot enough to use your pots and pans and to boil water in a kettle on the surface-top. As with any other heat source, practice fire safety and keep fire extinguishers at the ready. Have CO detectors checked monthly and change the batteries every six months.
Outdoor Cooking
In the hot summer months, many people choose to cook outside even if there is no emergency just because it helps keep the heat outside. I remember many campouts in my younger years where I was over anxious to get my food cooked on the campfire. It was often burned on the outside and raw on the inside. Sometimes waiting for the flames to die down to coals and cooking longer rather than hotter, is a better way of cooking, especially if you are cooking raw meat. As always, practice fire safety and have a plan and means for putting any fire out before you light it.
Properly thawing, preparing, and cooking food is also important to prevent food bourn illness. Prevent cross-contamination by separating raw meat from other foods. Include a meat thermometer in your cooking supplies to be sure foods are completely cooked to the proper internal temperatures to kill off illness causing bacteria.
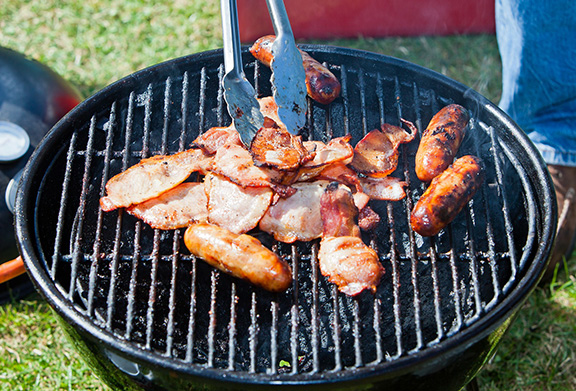 Charcoal or gas grill: Be sure to have plenty of extra fuel stored safely away from the house. This would depend on what type of fuel your grill uses, whether it's propane or charcoal.
- DO NOT use grills indoors.
- Keep children and pets at least three feet away.
- Keep your grill at least three feet away from the house, out from under the roof, away from deck railings, and from trees.
- Always open your propane or natural gas grill before opening it. Otherwise, a buildup of flammable gas in a confined space could cause an explosion.
- Stay close to your grill or any other open flame while it is lit. Keep an eye on it.
- Clean your grill after each time you use it to remove grease that could start a fire.
- When you are finished grilling, if you are using charcoal, let the coals completely cool (cool to the touch) before removing them from the grill. Store them in a metal can with a lid.

Butane Stove
Camp stove: As with any equipment, follow the manufacture's directions before using. Camp stoves tend to be fueled by propane, butane, or Coleman white gas.
- Only use the recommended type of fuel for your stove.
- Camp stoves need to be used in well ventilated areas and are not to be used indoors or even in garages.
- Do not use a pan or pot heavier than is recommend for your stove
- When installing a fuel canister or hooking up to a propane hose, cover connections with clean, soapy water. If bubbles form, the connection is leaking and should be taken apart and reconnected. If bubble continue to form after multiple tries, you may need to get your stove repaired or replaced.
- As with any open flame, stay close to your stove while it is lit. Keep an eye on it.
Open camp fire: Campfire cooking is fun and easy to do. If you don't go camping very often, learning how to safely build, light, and extinguish a campfire is an important skill to have. A campfire gives you many options for cooking depending on the other supplies and skills you have. Here are a few you should try.
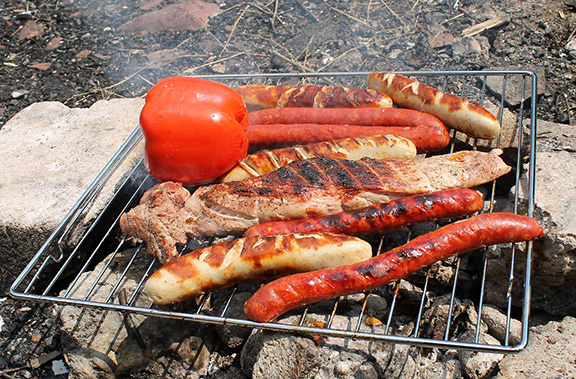 A grilling rack over your fire keeps your food, pot, and pans out of the direct heat and ashes in the fire. Suspend a grill rack over the fire or build up the sides around your fire with rocks or bricks so you can lay a rack across the top of your fire. In a pinch, pull the rack out of your indoor oven and put that over your fire.
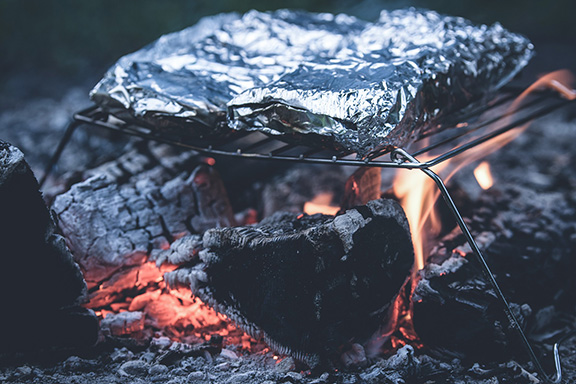
Foil meals can also be cooked on the rack or directly in the coals. Let the fire burn down to nothing but glowing coals. You do not want an open flame. Use a heavy duty aluminum foil to wrap your uncooked food in. Pull out enough foil to wrap around your food a couple of times. Lay the food out flat to give it as much surface area as possible so it will all cook at the same time, minimizing the burnt and the raw spots. Wrap the meal up in the foil and place it on the rack over the coals or directly in the coals. If cooking raw meat, potatoes, and vegetables all at the same time, be sure to use the cooking thermometer to make sure meat is fully cooked.

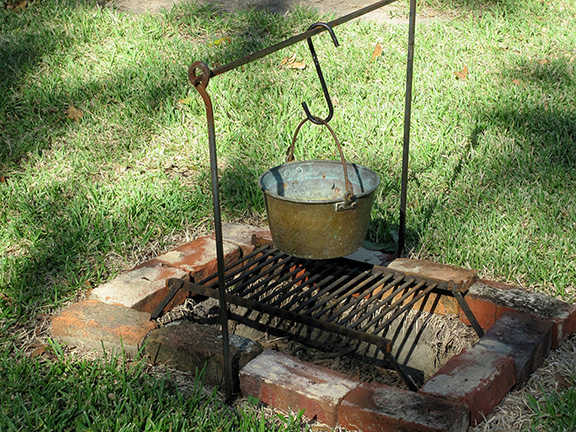 Many of us probably had our first introduction to outdoor cooking my roasting hotdogs or marshmallows over a fire with a straightened out wire hanger or a stick. This is about as simple as it gets. The same principle can also be used to hang pots over a fire. Make sure that whatever you are using to hang your food or pots from is study and well anchored. You don't want it falling into the fire and spilling your meal. Also, if you are using a stick or branch to hold your meal, make sure it's green and far enough away that it won't catch fire. A spit can be made with branches or purchased from a camping supply store. Pots, kettles, grill racks, and the food itself can be suspended above the fire using these methods.
Dutch ovens have been used for hundreds of years to bake, stew, fry, and roast. Properly preparing or “seasoning” a Dutch oven prevents rust and creates a nonstick coating that makes cleaning easy. Rescue an old Dutch oven by removing the rust and then re-season it. To cook, put it directly on coals or hang it from above. You can use wood or charcoal, but charcoal is a little easier to regulate temperatures. Nine to ten charcoal on bottom and 15 to 16 on top heats a Dutch oven to about 350° F. Two briquettes on or off makes approximately a 25° F change. If you have multiple Dutch ovens with legs, “stack cooking” uses your coals more efficiently. The more you use your Dutch oven, the more "seasoned" it will be and the better it will work. A well taken care of Dutch oven will last for multiple generations.
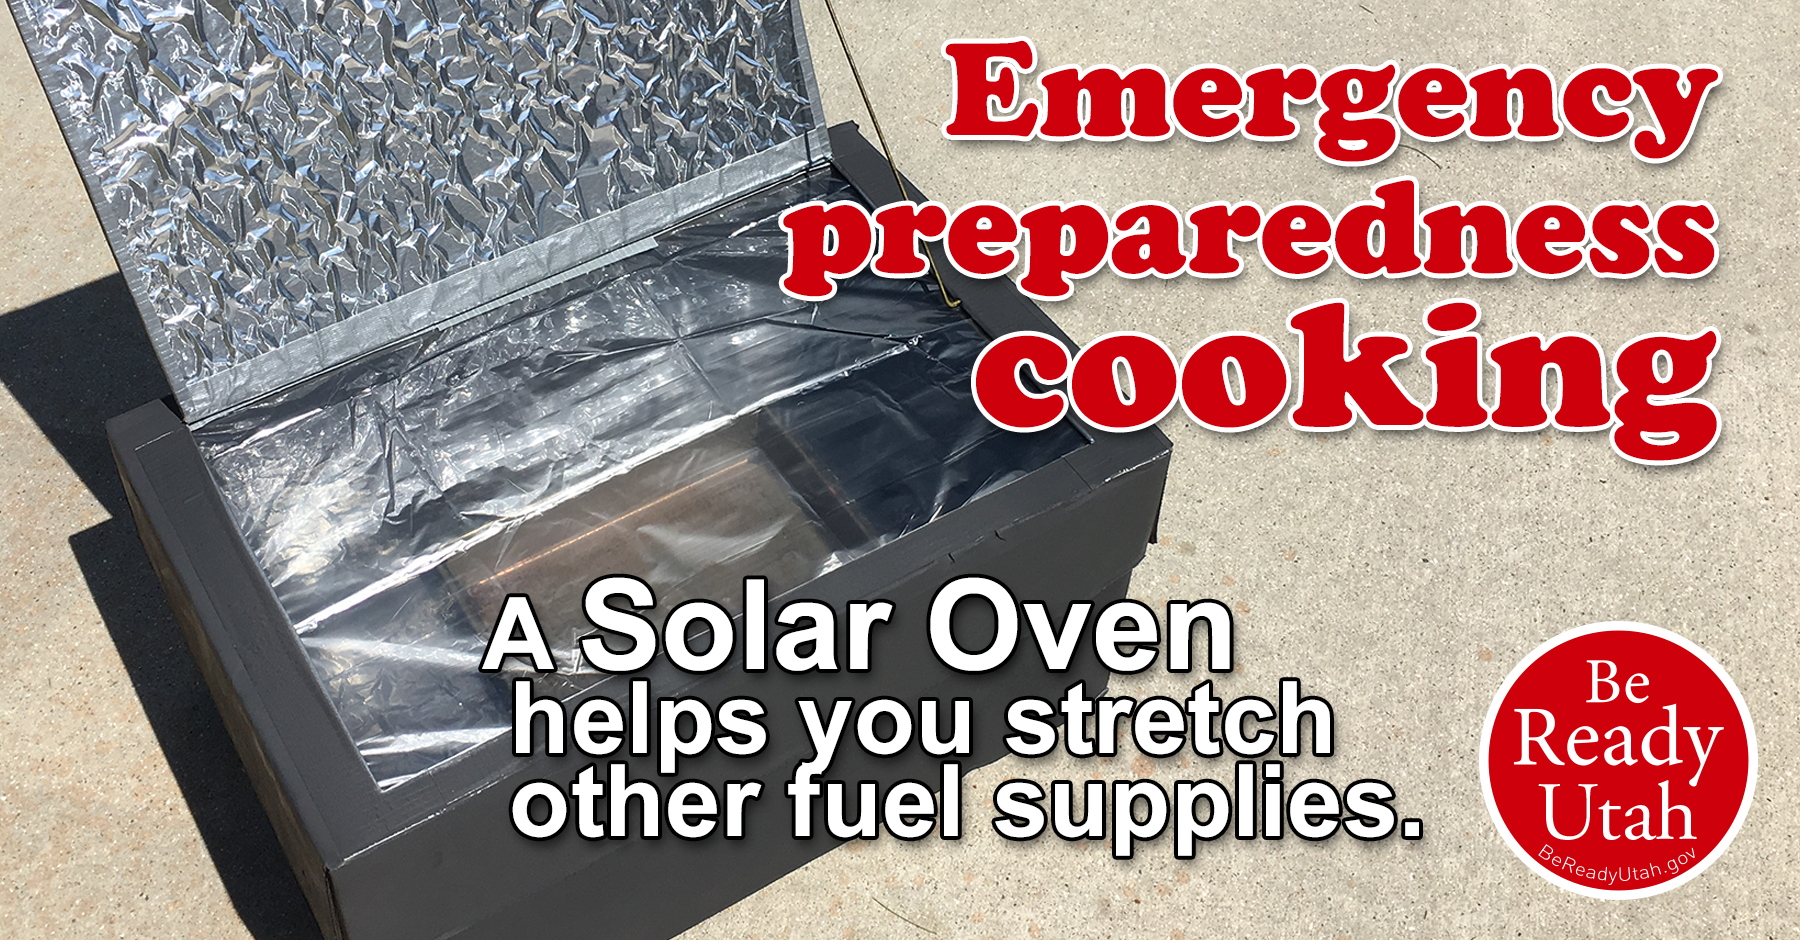
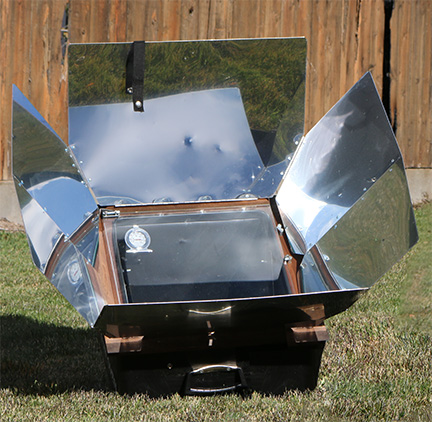 Solar ovens are one of our favorite ways of cooking. On a sunny day, quality solar ovens can reach 300° F to 360° F, depending on how direct the sunlight is. It does not require stored fuel, so you can stretch your other fuel supplies when the solar oven doesn't work. There is no fire hazard and it can be left unattended. This means that you can set the oven out in the late morning and orient it to where the sun will be the hottest during the day, then when you come back in the later afternoon, you will have a hot meal waiting for you.
Solar ovens also produce a different kind of heat. Everything inside warms at the same rate because the heat is indirect. There are no hot spots. Indirect heat means that even though you are cooking with similar temperatures to a regular oven, the food doesn’t burn. That being said, it is a good idea to use a trivet under your pot of food to allow the heated air to completely circulate around it for faster and more complete cooking. Food cooked in a solar oven is more moist than in a traditional oven. As such, leave additional water out when cooking fresh vegetables or meats. Their natural juices are enough to keep them from drying out.
A solar oven is most efficient on sunny days in areas where shadows are not a concern. The best cooking times are between 10:00 AM and 3:00 PM, though it can still cook slower before and after those times. For the fastest cooking times, reorient the front of the oven toward the sun every 15 to 20 minutes. On a clear day, an efficient solar oven can even work during the winter months when temperatures are below freezing. You will just have longer cooking times. You can help your solar oven retain heat better in cold temperatures by insulating around the outside with blankets. Be sure not to block the sunlight to the face of your oven.
A solar oven works on three principles:
- A solar oven converts sunlight into heat. It does this by absorbing light that passes through the clear door onto the dark surfaces inside the oven, rather than reflecting that light away. For better performance, use dark or clear pots and dishes in your cooking to minimize light being reflected out of your oven. Absorbed light energy becomes heat. The cleaner and clearer your door is, the more light will pass through it to be absorbed. The darker and less reflective the inside of your oven and pots are, the easier it will be to absorb light as heat. The more heat absorbed, the hotter your oven will be.
- As light is absorbed as heat, it is trapped in the oven by the clear door and the insulation around the oven. Trapped heat builds up and the internal temperature of the oven begins to rise. The more insulated your oven, the less heat will be able to escape and the hotter your oven will be.
- The third principle is to focus as much light into your oven as you can to be converted into heat. This is done by panels of reflective material that funnel sunlight in. The more sunlight going in to be absorbed, the hotter your oven will be.
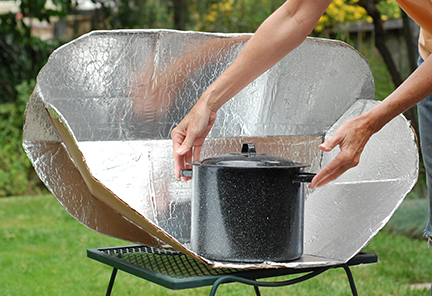
Panel solar cooker
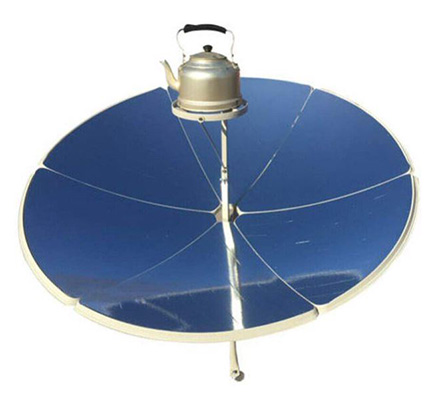
Parabolic solar cooker
There are other kinds of solar cookers as well, like panel and parabolic cookers that need to be reoriented to the sun every 10 to 15 minutes to maintain the most intense light and heat.
Disaster Supply Kit: Cooking
Click Here
Coffee Can Stove
You can make different kinds of cooking supplies from materials
found around the home. A coffee can stove is one
of the easiest to make.
Click Here
Soda Can Stove
Click Here

Solar Oven
Click Here
Reflective Box Oven
Click Here